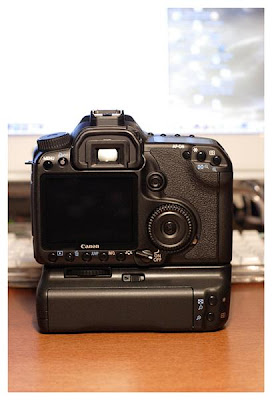
 The 40D looks even bigger with the battery grip attached
 The most obvious difference at the back is of course the huge 3″ LCD of the 40D compared to the tiny 1.8″ LCD of the 20D. The difference of course is smaller compared with the 2.5″ LCD of the 30D. The layout of the buttons is different from 20D and 30D.
 The most obvious change in external appearance compared to the 20D (and partially with the 30D) is of course the huge 3″ LCD at the back of the camera.
 Changes in features and design
Besides different buttons layout on the back of the 40D compared with the 20D and 30D, there is a new AF-ON button now.
 The AF-ON button has many functions.
in the creative zones (P, Tv, Av, M and A-DEP modes), pressing the AF-ON button will have the same effect as pressing the shutter button halfway
holding down the AF-ON button in Live View mode will lift the mirror and activate autofocus
The AF-ON button can perform different function depending on custom setting:-
a) during autofocusing, you can press the AF-ON button to stop autofocusing
b) in AI Servo mode, you can press AF-ON button to repeated start and stop AI Servo AF operation
c) press AF-ON button to meter and autofocus, and press the shutter button halfway to attain AE lock
d) you can disable the function of the AF-ON button
There are some obvious changes on the top of the camera too. The top LCD on the 20D and 30D does not permanently display the ISO setting, you need to press the ISO button before you can see the ISO setting. On the 40D, ISO setting is now permanently displayed. the layout of the buttons are slightly different too. ISO is now controlled by the right side button. On the 20D and 30D, ISO is controlled by the middle button.

 The most obvious change with the shooting mode dial on the left side of the 40D is the addition of 3 camera user settings.

 The hotshoe on the top is now stainless steel rather than black painted. The black paint of the hotshoe of the 20D and 30D would partially wear off. The new stainless steel hotshoe should be more hard wearing.

 The 40D is now partially environmentally sealed. You can see the seal around the CF compartment. The material is a kind of “felt” rather than rubber.
 The seal around the battery compartment is on the small removable door. The seal material is also made of felt.
 You can use the rear 3″ LCD to display settings (as on the top LCD), like in the EOS 400D. Of course the EOS 400D does not have a top LCD to display settings.
 Viewfinder improvement
According official Canon literature, the viewfinder view of the 40D is bigger and better than 20D and 30D:-
“The upgraded viewfinder increases optical magnification from 0.90x to 0.95x, expands the viewing angle from 25.1 degrees to 26.4 degrees and raises the eye point from 20mm to 22mm.”
Well, I have no way of objectively measuring the size of the viewfinder, but my subjective impression comparing with the 20D is that, the viewfinder view is definitely larger. The following diagram represents my VERY SUBJECTIVE comparison of the sizes of the viewfinder view between the 40D and 20D.

REMEMBER THIS IS ONLY A ROUGH SUBJECTIVE PERSONAL ESTIMATION!
One other major improvement with the viewfinder is that, ISO value is permanently displayed inside the viewfinder just like aperture and shutter speed. I would think this is a pretty low tech feature, but previously, Canon in their infinite wisdom, only kept this feature for their professional 1 series cameras.
Image Playback
There are some changes in image playback in the 40D, compared to the 20D and 30D.
Probably because of the increase to 3″, shutter speed, aperture and folder-file number are displayed even in the most basic review mode, a feature not present on either 20D or 30D

Press the INFO button once and the view include include image recording quality
 Press the INFO button again will change the view to shooting information and B&W histogram

Press the INFO button once more, and you will get color and luminance histogram. Color histogram was not available in the 20D. In the 30D, luminance histogram cannot be displayed together with color histogram.

Auto ISO
One the new features in the 40D is the inclusion of auto ISO. I personally do not like using Auto ISO as I always prefer to set ISO myself. But for those who want to use auto ISO, the following will tell you how auto ISO behaves in different shooting mode. I have tested auto ISO in different modes and can confirm they behave as stated by Canon.
In most of the auto shooting modes in the BASIC zone (Full Auto, Landscape, Close-up, Night Portrait,Flash Off), ISO speed is set automatically within ISO 100-800.
In the Sports shooting mode, ISO is set between 400-800.
In the Portrait shooting mode, ISO is fixed at 100.
In P, Av and A-DEP modes, The ISO will be set between 400-800. If overexposure would result at ISO 400, a lower ISO, as low as ISO 100 will be set.
In Tv mode, normally ISO 400 is set. For very bright or dark scenes, ISO will be set automatically within 100-800.
In M mode, ISO is fixed at 400
With flash, ISO will be set to 400 in all shooting modes. If overexposure would occur, a lower ISO ,as low as ISO 100, will be set.
Automatic Sensor Cleaning
Predictably, Canon has added this feature to the 40D, as it has been already included in the low end 400D since last year.
The automatic sensor cleaning operates every time you turn the camera on and off. You can also activate sensor cleaning at any time in the menu.


If automatic sensor cleaning cannot remove all the dust, you have to option to take a “dust map” and let the software during post-processing to remove the erase the dust spots in the images during post-processing. Unfortunately, this only works with Digital Photo Professional and not with any 3rd party RAW conversion software.


Shutter/Mirror Noise
The 20D has a very loud shutter/mirror noise. The 40D shutter mirror noise is much quieter. The quality of the noise is different too. The 20D noise sounded like a very loud “CLARRK”. The 40D sounded like a subdued “claff“. As I don’t have a sound meter, I can’t give you an objective measure, but subjectively, I would say the shutter/mirror noise of the 40D is about 30% volume of the 20D. Overall, a very welcome reduction.
Changes in Menu Structure
The menu structure has changed compared to the 20D/30D. In the 20D/30D, after you press the MENU button to access the camera’s menu, all the different choices are arranged in one long list and you turn the large scroll wheel ( Quick control dial) on the back of the camera to find the item you want.
In the 40D, the items are now broken up into different parts, which you can first select and access by either using the Multi-controller at the back of the camera or the Main Dial behind the shutter release button.


Internal Flash Settings
One new and little known or publicized feature of the 40D is that there is a separate menu for flash function settings for the internal flash. You can set curtain sync to 1st or 2nd curtain, use Flash Exposure Compensation (FEC) and set different metering mode for ETTL-II. Since there is another menu for external flash, you can now now have different flash function settings for the internal and external flash since there are 2 separate independent menus.
The 40D has 3 custom user settings. You can preset a certain set of shooting modes and custom function to one of the three Custom User Setting position (C1, C2, C3 on the shooting mode dial). Say you can set M shooting mode, Long Exposure Noise Reduction and Mirror Lock Up in the custom menu and then register this combination to one of the 3 Custom User Setting position. So for example, you can have one set of setting for shooting long exposure night photography and set it ti C1. Another set of setting for shooting fast action sport and set it to C2 and yet another set of setting for shooting portrait and set it to C3.
To enable autofocus in Live View, you will also have to make enable it in the custom menu.
Once you have made the correct setting in the custom menu, you can activate Live View at any time by simply pressing the SET button.
There is a small rectangle which you can freely move around. This rectangle represents the area which you can magnify by up to 10x to assist with accurate manual focusing.
To use autofocus during Live View, you will need to have set AF to the center focusing point only. Simply press and hold the AF-ON button for a second or so until you hear a “beep”, then release the button again. The camera will lower the mirror to get autofocus and raise the mirror again after you release the AF-ON button.
A few words about “Silent Shooting” mode in Live View. Silent in Silent mode does NOT really mean silent as in no sound at all. Silent in silent mode is really just a “quieter” mode or “delayed” noise mode. There are 2 Silent shooting modes.
In mode 1, you can shoot single shoot or continuously for up to 6 shots per second. Since the mirror is up, there is only the shutter noise, which is probably subjectively around 30-40% of the usual shutter+mirror noise. In mode 1, if you shoot continuously, you lose Live View as long as you are shooting.
In mode 2, you can only shoot single shot. When you press on the shutter release button the camera will take the shot with minimal noise. SO long as you keep your finger on the shutter release button, there will not be any shutter noise. The moment you release your finger though, the shutter noise will occur. This maybe the preferred mode to use if you are trying to shoot an insect or animal that may be scared away but the shutter noise. By delaying the shutter noise, you will be able to get your shot before the shutter sound will scare away your subject.

+(Medium).jpg) EOS 40D With Highlight Tone Priority enabled, the ISO setting will be limited to 200-1600. ISO 100 and 3200 will not be available.
EOS 40D With Highlight Tone Priority enabled, the ISO setting will be limited to 200-1600. ISO 100 and 3200 will not be available.+(Medium).jpg)
 I can see a subtle increase in detail in the clouds in the second photo. I have taken other test shots for which I could not detect any difference between the photo with this feature enabled and the one without. For the moment, I have to say the effect of Highlight Tone Priority is subtle at best and the effect can quite easily to achieved during post-processing. However, I will reserve judgment until I have time to test out this feature more thoroughly.
I can see a subtle increase in detail in the clouds in the second photo. I have taken other test shots for which I could not detect any difference between the photo with this feature enabled and the one without. For the moment, I have to say the effect of Highlight Tone Priority is subtle at best and the effect can quite easily to achieved during post-processing. However, I will reserve judgment until I have time to test out this feature more thoroughly.+(Medium).jpg)
+(Medium).jpg)
+(Medium).jpg)
+(Medium).jpg)
+(Medium).jpg)
+(Medium).jpg)
+(Medium).jpg)
+(Medium).jpg)
+(Medium).jpg)
+(Medium).jpg)
.jpg) ISO 1600
ISO 1600.jpg) ISO 3200
ISO 3200.jpg) ............................................................... EOS 40D review by http://rolandlem.wordpress.com
............................................................... EOS 40D review by http://rolandlem.wordpress.com Camera User Settings

 Live View
 To enable autofocus in Live View, you will also have to make enable it in the custom menu.
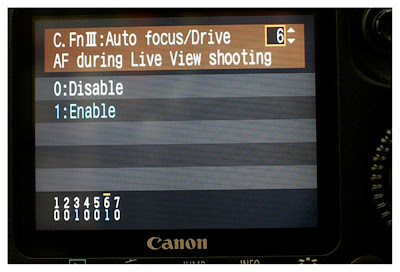 Once you have made the correct setting in the custom menu, you can activate Live View at any time by simply pressing the SET button.
 There is a small rectangle which you can freely move around. This rectangle represents the area which you can magnify by up to 10x to assist with accurate manual focusing.
 To use autofocus during Live View, you will need to have set AF to the center focusing point only. Simply press and hold the AF-ON button for a second or so until you hear a “beep”, then release the button again. The camera will lower the mirror to get autofocus and raise the mirror again after you release the AF-ON button.